Description and Explanation of Working.
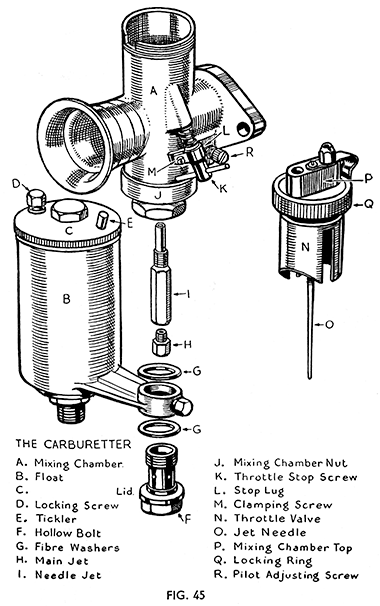
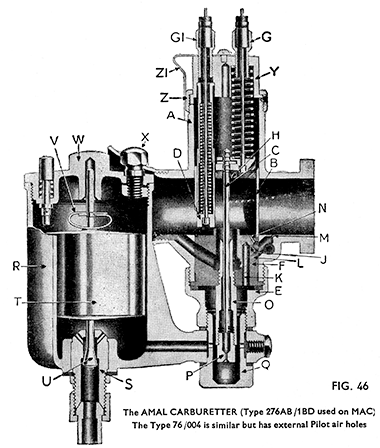
The illustrations provided should be referred to for explanation of the text.
The purpose of the Carburetter is to atomise the correct amount of fuel with the air that is drawn into the engine and thus supply a correctly proportioned mixture at all engine speeds and all throttle settings. This is achieved by the selection of the correct size main jet, and main choke bore, in conjunction with the right adjustment or setting of the jet needle and the Pilot jet.
By means of the Twist grip on the Handlebar the volume of mixture and therefore the power is controlled, and at all positions of the throttle the mixture is correct. The opening of the throttle brings into action first the mixture supply from the Pilot-jet System for idling (i.e., ticking over) at slow speed, then as it progressively opens, via the Pilot By-pass, The mixture is augmented afterwards from the Main-jet, the earlier stages of which action are controlled by the Needle in the Needle-jet. The Main-jet does not directly spray into the Mixing-chamber, but discharges through the Needle-jet into the Primary Air Chamber, and the discharge goes from there as a rich, fuel-air mixture through the Primary Air-choke into the Main Air-Choke. This Primary Air-Choke has a compensating action. A separately operated mixture control is also provided by the Air-valve (operated from the handlebar) for use when starting from cold, and until the engine is warm. This control partially blocks the passage of air through the Main-choke.
The Float-chamber maintains a constant level of fuel at the jets, and cuts off the supply when the engine stops. It is however, always advisable to turn off the fuel at the taps if the machine is stopped for more than a few moments or is not likely to be needed for some time, as this prevents the wastage of fuel which may escape from the Carburetter, particularly if the machine is left leaning towards the right-hand side.
Hints and Tips.
Always see that there is the minimum of backlash or lost motion in the Controls, so that the movement of the Air-lever or Twist grip immediately brings about the movement of the Air and Throttle-valves respectively. The adjustment is made by means of the adjusters on the top of the Mixing-chamber (on pre-war Models throttle cable is adjusted differently - see page 93). Screw the adjusters anti-clockwise to take up slackness. Also see that the control Cables are so arranged on the machine that any movement of the Handlebar does not affect the Carburetter.
Should it be suspected at any time that fuel is not reaching the Carburetter properly, the feed can be verified by detaching the pipe below the float chamber and momentarily turning on each tap in turn. Fuel should gush out if the pipe and taps are clear. A stoppage of the air vent hole in the fuel tank cap can cause an air lock in the tank and stop the flow. See that this hole is kept clear. Flooding may be due to a worn or bent Float-needle, or a leaky Float, but nearly all flooding with new machines is due to impurities (grit, fluff, etc.) from the tank—so clean out the Float-chamber periodically till the trouble ceases. Note that if the Carburetter is flooding with the engine stopped, the overflow from the main jet will not run into the engine but out of the carburetter through the small hole in the side of the Carburetter-body.
Erratic slow running is often caused by air leaks, so verify that the joint between the flange of the Carburetter and the Cylinder head is properly made and nuts tight. Check for air leaks by putting a little oil round the edge of the joint packing. On machines which have run a considerable mileage a worn throttle may be responsible.
Banging (i.e., explosions) in the Silencer may be caused by a choked Pilot-jet or to too weak a pilot mixture (through incorrect adjustment) when the throttle is closed or nearly closed - also it may be caused by too rich a pilot mixture or an air leak in the exhaust system. The reason in either case is that the mixture has not fired in the cylinder but has fired in the hot silencer or been ignited there by a incandescent particle of carbon from the exhaust port. If the banging happens when the throttle is fairly wide open it is more likely to be due to ignition. Remove the sparking plug, clean, adjust and refit.
Bad Fuel Consumption may be due to flooding or leaking pipe, and taps - also to a worn Float-needle Valve (if the machine is an old ones) or else to a worn Needle-jet. This can sometimes be remedied or improved by lowering the needle in the Throttle-valve, but if it cannot be - then the only remedy is a new Needle-jet.
Avoid an over rich pilot setting which will make the consumption very heavy if a lot of running is done in conditions of heavy traffic
Usually when an Air Filter is fitted the main jet is of smaller size than would be used without a Filter, so that if the Air Filter is removed and the machine used without it, care must be taken not to overheat the engine due to too weak a mixture. Testing with the Air Valve will indicate if a larger Main-jet and higher Needle position are required.
Faulty running may not be due to Carburation. If the trouble cannot be remedied by making the mixture richer, or weaker with the Air-valve, and it is known that the fuel feed is good and the Carburetter is not flooding, the trouble is elsewhere. When re-assembling the Carburetter after dismantling, always note particularly that the Mixing-chamber Nut (the large hexagon below the Mixing chamber) is tightened up fully on to the red fibre washer below the Jet-block, otherwise fuel will leak up. When replacing the Throttle, see that the Throttle-needle goes into the centre in the Choke-block and once in, note that the Throttle works freely when the Mixing-chamber top Ring is screwed down firmly.
Float Chamber Lid. (Fig. 46).
To remove, first loosen the small hexagon head screw (X) (turn anti¬clockwise), and unscrew lid by means of the large hexagon (W) in the centre (unscrew anti-clockwise). To remove the Float (T), pinch the spring bow (V) on top of the Float and pull Float up. When replacing slip the Float over the Needle (U) till the bow clicks into the needle groove Select the correct groove and pinch the bow to allow the Needle to be engaged in the correct position. Take care always to avoid bending the needle.
The Throttle Stop Screw. (Fig. 45).
This should be set so that when it is turned with the stop lug facing back the throttle is held open sufficiently to keep the engine running slowly when the twist grip is shut off. On Velocette machines an adjustable stop lug is fitted in place of the lock nut illustrated below, and the screw has a small cross bar to facilitate operation. The stop lug is held by a small clamping screw to the stop screw, and should be tightened up when the correct setting has been obtained. The stop screw is then available for obtaining the correct setting of the Throttle for starting from cold. This position is given by turning the stop screw until the stop lug is right forward. Keep the Twist-grip shut off when starting.
Pilot Air Screw.
This screw regulates the strength of the mixture for " idling " and for initial opening of the Throttle, by controlling the suction on the Pilot
petrol Jet by metering the amount of air that mixes with the fuel. Usually it gives the correct mixture when set from l to 2 turns out (anti-clockwise) from the fully screwed-in position.
Main Jet. (Fig. 46).
The main jet (P) controls the fuel supply when the Throttle is more than three-quarters open, but at smaller openings, although the supply of fuel goes through the Main-Jet, the amouht is diminished by the metering effect of the Needle (C) in the Needle-jet (0). Each jet is calibrated and numbered so that its exact discharge is known and two Jets of the same number are alike. Never ream out a Jet. Get another of the right size if a larger Jet is found to be necessary. This however is unlikely, to be required. The bigger the number on a Jet the bigger the Jet.
To get at the Main-jet, undo the Float chamber holding bolt (Q). The Jet is screwed into the bottom of the Needle-jet, If the jet is tight hold the Needle-jet carefully with a spanner whilst unscrewing the Main-jet.
Needle and Needle Jet. (Fig. 46).
The Needle (C) is attached to the Throttle-valve (B) and being taper, either allows more or less fuel to pass through the Needle-jet as The Throttle is opened or closed throughout the range, except when idling or at nearly full throttle. The Needle-jet is of a defined size and is only changed or altered from standard when using special fuels such as Alcohol.
The taper needle position in relation to the Throttle opening can be set according to the mixture required by fixing it to the Throttle-valve with the needle clip spring in a certain groove, thus either raising or lowering it. Raising the needle enriches the mixture and lowering it weakens the mixture at throttle openings from half to three-quarters open. Normally the clip-spring is set in the third groove from the top
Throttle-Valve Cut-Away.
The atmospheric side of the Throttle valve is cut away to influence the depression on the main fuel supply and thus gives a means of control between the Pilot and Needle-jet range of Throttle opening.
The amount of cut-away is recorded by a number stamped on the top of the Throttle valve, viz. 6J4 means type 6 Throttle valve with No. 4 cut-away. A larger cut-away, say 5 gives a weaker mixture and 3 and 2 richer mixtures.
Air Valve.
(D). This is used only for starting and running when the engine is cold, and for experimenting with, when setting the Carburetter. Otherwise it is always set full open.
Tickler.
A small plunger (spring loaded) in the Float-chamber Lid. When pressed down on to the float, the needle valve is pushed off its seat and allows fuel to flow through and " flooding " is thus achieved.
Flooding temporarily enriches the mixture until the level of the fuel subsides to normal.
HOW TO SET AND ADJUST THE CARBURETTER.
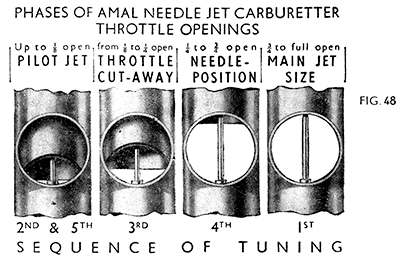
Proceed in the following order only. By so doing you will not upset good results obtained. See illustrations of various phases of Throttle opening.
Note.—The Carburetter is automatic throughout the Throttle range - the Air Valve should always be wide open except when used for starting or until the engine has warmed up.
1st. Main Jet with Throttle in Position 1.
Test engine for full throttle. It may be found at full throttle that the power seems better with the Air-valve slightly closed. This indicates too small a main jet.
2nd Pilot Jet with Throttle in Positions 2 and 5.
With engine idling too fast with Twist grip shut off and the Throttle shut down on to the stop screw :
- Loosen stop lug and turn the stop screw down until the engine runs slower and begins to falter, then screw the pilot air screw in or out to make the engine run regularly and faster ;
- Now gently lower the Throttle stop screw until the engine runs slower and just begins to falter, then lock the stop lug by means of the small clamping screw so that the lug is in contact with the side of the mixing chamber to the rear of the stop screw. Now begin again to adjust the pilot air screw to get the best slow running. If this second adjustment makes the engine run too fast, go over the job a third time. Finally, lock up the lug tightly without disturbing the correct setting of the screw. Considerable time will be saved if a start is made with the pilot air screw set between 1½ to 2 turns unscrewed from its fully closed position.
3rd. Throttle Cut-away with the Throttle in Position 3.
If as the Throttle is opened from the idling position, there is objectionable spitting from the Carburetter, slightly enrich the pilot mixture by screwing the air screw in about half a turn, but if this is not effective, screw it back again and fit a Throttle valve with a smaller cut-away. If the engine jerks under load at this throttle position and there is no spitting, Other the throttle needle is much too high or a larger throttle cut-way is required to cure richness.
4th. Needle, with Throttle in Position 4.
The needle controls a wide range of Throttle opening and also the acceleration. Try the needle in as low a position as possible, viz., with the clip in a groove as near the top of the needle as possible, if acceleration is poor and with air valve partially closed the results are better, raise the needle by two grooves, if very much better, try lowering the needle by one groove and leave it where it is best. Note. - If the mixture is still too rich with the clip in the top groove — the needle jet probably requires replacement because of wear. The needle itself seldom wears out.
5th. Finally.
Go over the idling again for final touches.
Carburreter Settings
|
Model MOV. |
Main Jet |
120 |
|
|
Needle Jet |
4 /061 |
|
|
Needle No. |
5 /065 |
|
|
Throttle valve No. |
5 /3 |
|
|
Throttle needle clip setting |
third groove |
|
Model MAC. |
Main Jet |
130 |
|
|
Needle Jet |
4 /061 |
|
|
Needle No. |
6 /065 |
|
|
Throttle valve No. |
6 /4* |
|
|
Throttle needle clip setting |
third groove. |
|
Model MSS. |
Main Jet |
180 |
|
|
Needle Jet |
4 /061 |
|
|
Needle No. |
6 /065 |
|
|
Throttle valve No. |
6 /4 |
|
|
Throttle needle clip setting |
third groove |
|
|
*Type 6 /3 is standard for engines with iron heads. |
|


