F62-1R Service Manual
Replacing the Shafts and Gears.
Heat up the rear end of the gearbox and insert the two rear end ballraces in their housings, tapping them fully home. When the housing has cooled fit the secondary shaft oil seal - see previous section. Take the secondary shaft with the gears assembled to it and enter the splined end through the rear end ballrace and tap it home carefully. Take the primary gear shaft with the gears fitted to it and from inside the housing enter the splined end through the opening in the front of the gearbox. Bring the gears into mesh, and enter the rear end of the shaft into the rear end ballrace that has already been fitted to the housing.
Fit the two ballraces to the front cover. An easily made tool for fitting the oil seal is shown in Fig. 19. The flat face of the oil seal must be fitted flush with the bottom of the groove that is cut in the front of the cover. Do not tap it in too hard or the ballrace may shift.
Fit the front cover using a new gasket. See that the dowels are in place, and tighten the cover nuts evenly and securely.
Place the forks in position, the double one on the right engaged with the third speed and fourth speed sliding gears on the primary gear shaft. The left hand side fork engages with the double gear on the secondary gear shaft. Hold them in place and after oiling the fork rods slide them into the holes in the rear of the gearbox, through the forks, and screw them into the threads in the front of the gearbox. Screw on the locknuts and tighten.
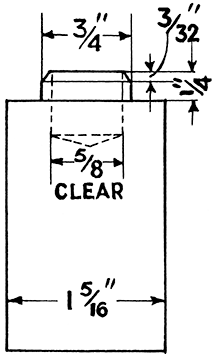
Fig. 19
Gearbox end Cover Oil Seal should be fitted
by means of a Tool such as the one shown
Refitting the Clutch Bell Assembly.
Do this before fitting the top cover. Fit the oil seal collar. Push the bell on to the splines of the primary gear shaft and fit the tab washer. There is sometimes a slight fraize around the edge of the washer. Fit it so that any fraize that there is is remote from the turned-over tab, giving a truly flat surface to fit against the bell. The lock-ring is machined with a shoulder and reduced diameter on one side (becoming a washer-faced nut) and the .781-in. diameter must fit inwards against the tab washer.
The point is stressed because of the necessity of getting an oil-tight joint between the lock-washer and the bell, and the bell and the lock-ring. If this is not done oil can work along the splined shaft into the clutch.
Two gears can be engaged at once to hold the shaft whilst the lock-ring is securely tightened. Bend over the tab-washer when the lock-ring is tight.
Refitting the Top Cover Assembly.
See that the forks are set so that the gears are in neutral. Set the cam¬plate so that the indexing pawl is engaged in the neutral notch in the edge of the plate. Fit the cover dowels, a new cover gasket, and place the cover in position engaging the cam plate slots over the selector fork pegs. Fit all nuts and tighten up evenly a little at a time until all are secure.