Unless a complete overhaul is needed there is no necessity to remove the Gearbox from the machine, as all internal parts are readily removable with the assembly still in the frame - if the work is undertaken in this way, however, the machine should be raised on to a trestle. The work is rendered much easier in this way.
Preliminary Work.
Disconnect the Clutch Control Cable from the Handlebar-lever first and then from the connecting-piece in the Gearbox.
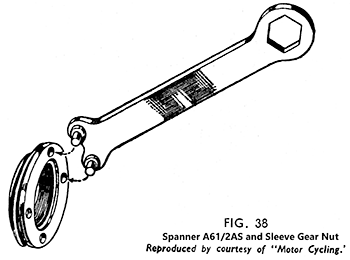
Unscrew and remove the hexagon-headed Bearing Cap just above the Filler-plug in the Gearbox End-cover. Upon the standardisation of the rounded smooth outline gearbox end cover (at engine No. MAC15791) a distance piece is fitted between the gearshaft ballrace outer ring and the cap. Loosen the large nut thus disclosed, holding the Gearshaft from turning meanwhile by having the Rear Brake applied by an assistant.
On MOV and MAC to remove the gearbox from the machine, proceed as described on page 54 to remove the Primary Chain cover, the Chain and the Clutch. Remove the drain plug from the rear at the bottom of the Gearbox housing and drain out all oil. Take out the split-pin from and remove the bolt which secures the Adjuster-bolt at the top of the housing to the nearside rear engine-plate.
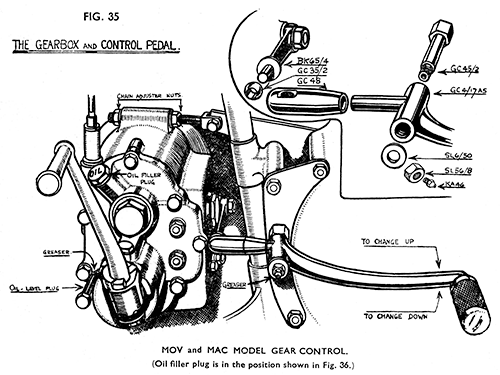
Take off the nut and washer from the Gear-control Pedal-pivot and pull the lever with the swivel and sleeve off the pivot. Unscrew the four nuts and remove the half-clips from the studs below the Gearbox. Raise the Gearbox off the cross tube of the frame and take it out of the machine.
On MSS Models remove engine and gearbox (see page 54).
Dismantling the End-Cover.
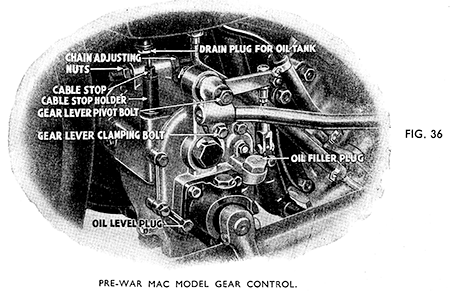
The pre-war MOV and MAC Models and all MSS Models have the gear control lever in a bushed lug at the top. (See Fig. 36). On these models the gear control lever and pivot with the control rod should be removed by taking off the nut from the pivot and disconnecting the gear rod swivel joint from the outside striking lever on the gearbox. The
Footstarter ratchet is carried in a separate steel housing bolted to the cover. This housing can be removed before taking off the end cover or can be left attached as desired, but if attention is needed to the ratchet or return spring only, it is easier to take it off leaving the end cover in place.
If the Footstarter mechanism does not need attention, the housing can be left in place fixed to the cover and the dismantling carried out as described below.
If the Footstarter Ratchet or Return spring are to be renewed, loosen the Anchor pin for the Return spring in the top of the Ratchet Housing on the cover, and take off the nut and washer from the cotter securing the Footstarter crank to the Ratchet before taking off the housing or the cover.
Remove the Oil-level-plug from the end cover. Now remove the nut from the end of the Gearbox (previously loosened) and tap the shaft into the Gearbox about an inch.
Take out the bolts securing the End-cover to the housing, and the two nuts (not fitted on MAC models after engine no. MAC15790) off the ends of the Selector-fork Pins. Pull off the cover with the Footstarter mechanism all in one.
Attention to the Footstarter is dealt with on page 81.
Note that the end of the Layshaft is supported in the Footstarter-ratchet in a floating bush (early types have a roller bearing). This bush may remain on the end of the Layshaft or come out with the Ratchet. In either case, be careful not to lose it or the Thrust-washer inside the hollow end of the Ratchet behind the floating bush. The bush should be a free fit on the Layshaft and in the Ratchet.
Removal of Selector Fork Rods and Gears and Shafts.
Take off the loose low-gear wheel from the end of the Gearshaft. Engage either second or third speed and draw out the two Selector-fork Pins. They are now grooved at one end to provide a purchase for levering out. On earlier models thread the nuts back on to the ends of the Pins. The Pins can then be levered out with the end of a Screwdriver or tyre-lever against a piece of material I-in. thick placed on the machined face of the Housing to act as a fulcrum. Pull out the Gearshaft from the Clutch side through the Sleeve-gear.
By twisting the upper Selector-fork so that the Operating-peg clears the cam track, the fork and the Double gear can be extracted. In a similar manner the Layshaft assembly and the lower Fork can be removed. This leaves only the Sleeve-gear, which can be tapped into the Housing through the large Ballrace.
SPECIAL NOTE.—On MSS Models with 17 T. Sleeve Gear and on other Models when close ratio (17-27) Gears are fitted, the Sleeve Gear has to be turned until a position is reached where the 16 T. Top Gear pick-up dogs do not mask the layshaft gear teeth, otherwise the layshaft gear can¬not be withdrawn from mesh with the Sleeve Gear.
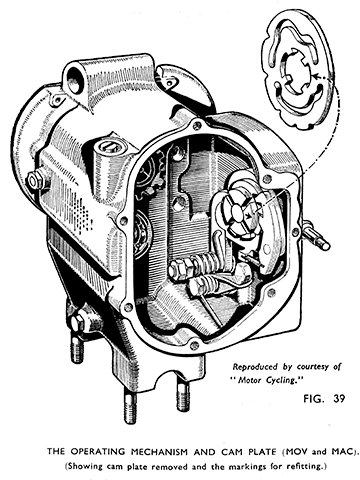
The Operating Mechanism. (Fig. 39).
It is exceedingly unlikely that any attention will be needed to this part of the Gearbox, as from experience over a period of many years we have found the parts comprising the internal Control-mechanism to be virtually non-wearing, and no case of a breakage occurring has ever been known.
Should the Cam plate have to be removed it may be taken out with the small centre piece on which it is fitted by first depressing the Indexing-pawl at the bottom. Do not in any circumstances take the Cam-plate off the centre piece before marking both parts, so that they can be re-assembled in the same relative positions and with the Cam plate facing the right way round (Fig. 39).
The remainder of the Mechanism is quite easily removed if need be, but should on no account be taken apart unnecessarily.
Removal of Chain Cover, Etc.
If the Sleeve-gear Ballrace or the Ballrace shims are to be replaced or removed for inspection, the inner half of the Primary chain cover must be removed. Remove it as follows :-
Cut the locking wires from the securing screws. Remove the screws. Pull off the cover and joint packing behind it. Unscrew and remove two small screws securing the wire clip to the face of the housing. Take off the clip and lift out the Thrust cup. When re-assembling note that new locking wire must invariably be used.
The Bearings.
The condition of the large Sleeve-gear Ballrace and its Steel Shims can usually be verified without removal. Any sign of slackness or roughness in the bearing indicates that a replacement is needed. Inspect the shims (one at each side of the ballrace) to see that they are not worn or split. Pay particular attention to the inner one which may have been in contact with the Oil-thrower on the Sleeve-gear.
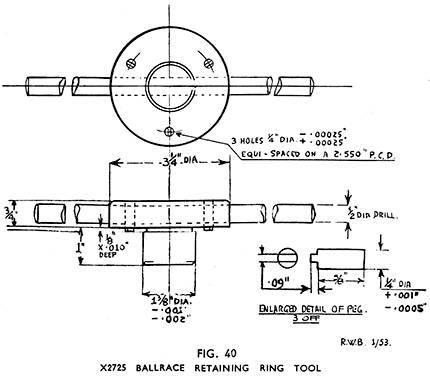
To remove the large Ballrace it is necessary to take out the Retaining ring by unscrewing it out of the housing. It is provided with three slots to facilitate removal. Use Service Tool X2725 (Fig. 40). If it is driven round with a punch it is essential to use one which is shaped properly to fit the slots, which will otherwise be damaged. Tap the bearing out when retaining ring and shim have been removed.
On refitting the Ballrace see that both shims are located as centrally as possible, so that the Distance piece for the Sleeve-gear does not foul when pulled up to the centre ring of the Ballrace. Also when the retaining ring has been screwed home fully the edge of the Housing must be " centre-popped " into the three notches around the outside.
The bearing for the Gearshaft in the end cover can be tapped out or into the cover with a drift 11/8-in. in diameter, 3-in. long, with a Pilot ½-in diameter, ½-in long. The larger diameter should be recessed to a depth of 1/16-in. round the pilot to a diameter of 1-in.
The Ballrace at the nearside end of the Layshaft can be driven out of its place into the Housing with a 7/8-in. diameter drift 3-in. to 4-in. long, after knocking the Oil-retaining Cap outwards through the centre of the bearing with a ½-in. diameter tommy bar. This Cap must be replaced and the housing " centre-popped " to secure it after the ballrace has been inserted. A drift 1½-in. diameter, 5-in. long, with a 5/8-in. diameter pilot ½-in. long, recessed to a depth of 1/16-in., and a diameter of 1¼-in. round the pilot is suitable for refitting the bearing.
The low gear bush and those in the layshaft gears seldom need renewal. If new ones are fitted bore out the low gear bush to .625-in. and the others to .8125-in. The limits are +.0007-in. —.0005-in. in both cases. The sleeve gear bush which is pegged to the sleeve gear can be driven out with a 15/16-in. diameter drift after the peg has been removed by drilling out with 3/16-in. diameter drill.
When replaced, it should be bored to give a clearance of .001-in. above the shaft diameter. A good fit is essential to obviate any side loads on the main-bearing, and it is desirable to bore and not to ream the bush owing to the risk ,if reaming is resorted to, of the bearing being made bell-mouthed - a cause of oil leakage. When boring see that bore is concentric with the ground outside ballrace seating.
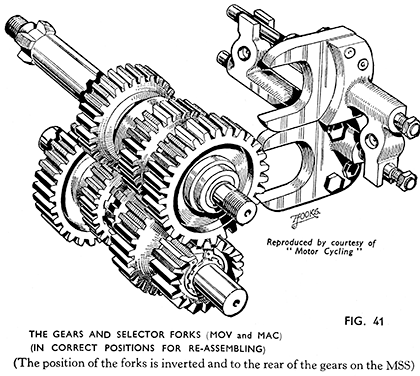
The Layshaft Assembly. (See Fig. 41.)
In order to remove the loose second and third speed gear wheels from the Layshaft it is necessary to remove the large Layshaft driven gear and the small ratchet gear respectively. The large Layshaft driven gear and the ratchet gear can be pressed or levered off the Layshaft. Note specially, however that a small thrust washer fits over the ends of the splines against the outside of the ratchet gear. Do not lose this. Also note that on some ex-Army MAC machines a spring circlip retains the ratchet gear in position. It is important in such a case not to attempt to remove the ratchet gear before taking this circlip out of position. It is however, necessary only to remove one of these gears, if only the sliding dog has to be replaced. The edges of the driving dogs on the second and third speed gears and upon the driving dog itself should be carefully inspected for wear as worn dogs may cause disengagement under load.
Assembly.
(If MSS or close-ratio, see Special Note, Page 77.)
Re-assembly is the reverse procedure of dismantling. First the Sleeve gear is inserted from inside and pressed through the Ballrace, being careful first to slip the Oil thrower over the Sleeve gear with the concave face towards the gear teeth. Next the Cam-plate, etc., the Layshaft assembly and Gearshaft with its gears are refitted in that order. Care is, of course, necessary when replacing the Layshaft assembly and the Double gear to see that the pegs of the Selector forks are properly engaged with the track in the Cam.
The Footstarter.
A swivelling foot-piece pivots in the top of a crank attached to the ratchet, on some Models the whole crank swivels in a lug attached to the ratchet.
Notes on using the Footstarter. It is very important not to kick sharply and the ratchet must be allowed to engage properly before putting heavy pressure on the footpiece. It will be noticed that as the footpiece moves down, the ratchet is allowed to slide into the ratchet housing on the end cover due to the swivel lug running off the disengaging cam formed at the end of the housing. It must be allowed to slide in properly, otherwise the ratchet will not engage properly, and damage may be caused to the teeth on the ratchet and on the ratchet gear. Do not hurry the operation — by being careful and deliberate time will be saved in the long run. Always release the footpiece as soon as the engine starts.
In the unlikely event of the Footstarter failing to return correctly on NO ACCOUNT must the machine be run unless the Foot piece is returned by hand to the disengaged (upright) position and secured there if necessary.
Unless it is necessary to replace the Ratchet or Return spring do not dismantle the Swivel-lug or F/S crank from the end cover. If the Spring is broken and is to be renewed proceed as follows :-
Fitting a Starter Return Spring.
The Footstarter Ratchet Housing should be removed separately, leaving the end cover in place (see page 38). Turn the F/S crank through 90 ° and drive out the cotter, pull it off from the end of the Ratchet and pull out the Ratchet and part of spring. When doing so take care not to lose the engaging-spring which fits inside the Return-spring or the three Rollers which operate through holes in the Ratchet against the loose Thrust washer. Take out the Anchor pin (already loosened, see " Dismantling the end cover ") and remove the remainder of the Spring. Should the return spring be unbroken a slightly different procedure is necessary for removing the Ratchet as follows :—
Take off the Nut and Washer from the Cotter, now obtain 2 nails about 2-in. long x ¼-in. in diameter (or slightly less) and cut off the heads, drive these into the bench 119/32-in. apart leaving them protruding about 1-in. Place the Ratchet Housing face downwards over the nails so that these enter the two breather holes which are drilled through the teeth of the Ratchet. Pull the housing round clockwise 90 ° against the tension of the spring and drive out the cotter. Release the housing, pull off the crank, and lift the Ratchet off the nails. Push the Ratchet through from the outside sufficiently to enable the loop of the Spring to be prised off the fixing lug on the Ratchet. When the Spring is unhooked push the Ratchet right out. The Return spring can now be withdrawn, after removing the Spring anchor peg.
The Return spring is slightly larger in diameter in its free state than the housing to which it is fitted and to replace a spring the following directions must be followed.
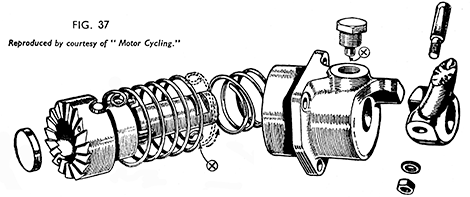
The smaller loop engages the Anchor pin, the larger the Ratchet.(see Fig. 37). Push the end with the smaller loop into the housing so that when it is fully home it will be directly below the Anchor pin hole to permit the tipof the Anchor pin to fit into it.
With a screwdriver press the Spring into the Housing, working round it spirally coil by coil until only sufficient is left out to be slipped over the lug on the Ratchet. Refit the Anchor pin. Place the engaging spring and rollers (or Thrust pins) in position, sticking the Rollers with some grease. Note that there are 6 holes in the Ratchet, three of which act as breathers. Place the Rollers in those holes which run right through into the parallel ground bearing surface inside the Ratchet.
Place the Ratchet in position, engage the loop of the Spring over the lug and push the Ratchet right home. Place the housing face downwards again with the Ratchet over the nails. Push the crank into place on the end of the Ratchet and pull the housing round against the tension of the spring SUFFICIENTLY FAR ONLY to allow the cotter to be tapped through its hole across the flat on the Ratchet. The cotter must be fitted with the Threaded end facing the rear of the machine. Fit the Nut and Washer and tighten up. If a new Cotter is required file the flat if necessary so that when the Cotter has been driven fully home the head is flush with the surface of the Swivel-lug.
Re-fitting the End Cover.
The footstarter housing need not be fitted until after the end cover has been replaced. Do not in any circumstances fit a packing washer between the K/S housing and end cover. This is important. Note specially that on MOV and MAC Models one of the end cover bolts is slightly shorter than the others, and it must be replaced in the correct position in the hole adjacent to the edge of the cam plate. A longer bolt used in this position will foul the operating pawl and prevent the proper working of the gear operating mechanism.
Place in position the layshaft thrust washer which fits over the ends of the splines protruding from the ratchet gear. Note that in the case of ex-Army MAC Models a circlip is used to retain the ratchet gear it is illustrated in Fig. 44. Place the end cover joint washer in position on the face of the end cover and push the end cover into position, locating the ballrace over the end of the gearshaft. Put in and tighten all fixing bolts except the one at the very bottom. Re-fit the nut to the gearshaft, tighten the nut and then refit the distance piece and cap. Fit and tighten the nuts of the selector fork rods and the gearbox is then ready for the footstarter housing and ratchet, etc., to be fitted. Place the hardened thrust washer into the bearing recess in the ratchet, smear the end of the layshaft with oil and slide the floating bush into place. On some early machines a caged roller race is used in place of this bush. It is necessary to see that the roller cage of this bearing is fitted so that the open end of the cage is remote from the ratchet gear. Smear the inside of the ratchet with oil, work the housing and ratchet into position over the bearing and tap it carefully into the end cover, finally securing it with the three fixing bolts. The gearbox is then ready for refitting to the frame.


