F62-1R Service Manual
Irrespective of whether attention is needed to the engine, starter, clutch or gearbox, the preliminary dismantling is done in the same way. The first step is the separation of the gearbox from the clutch housing.
Five studs project from the gearbox through the clutch housing and crankcase, and one goes through the gearbox from the clutch housing (Figs. 11 and 12). Remove the é-in. nuts from all six studs, but leave the two nuts that hold the clutch housing to the crankcase and oil filter assembly (Fig. 12). The sixth nut is accessible underneath the gearbox.
With the engine resting with the oil sump on a firm foundation, draw the gearbox assembly away from the clutch housing. It may need starting by tapping it carefully with a mallet or hide hammer. The starter return spring which is very strong is released as the gearbox comes clear. Unless precautions are taken to release it first and before the gearbox is taken right off keep the hands clear of the gap between the faces.
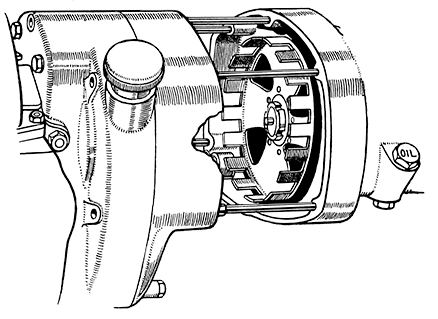
Showing the five long studs from which the nuts
must be removed in order to detach the gearbox.
To release the spring before the gearbox is drawn off, insert the bent-over end of spanner LET479 between the faces, and engage it with the end of the spring. Pull the spring outwards and spring it over the lower stud. The spring is shown caught on the stud in Fig. 12. It will release as it clears the stud. The gearbox is located by two dowels—shown in place in Fig. 12. These may come away on the studs. In any case preserve them carefully for use when reassembling.
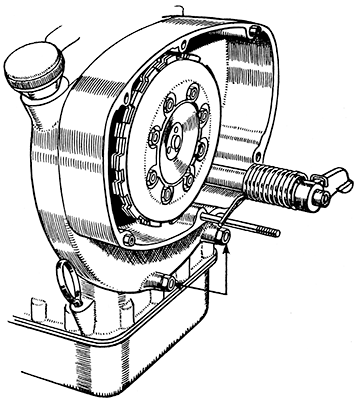
FIG.12
The two nuts at the bottom of the clutch housing are all that
have to be removed when the gearbox has been detached.
The gearbox is now ready for attention. Directions for stripping it and rebuilding are given on page 26.
Removal of Clutch Housing Assembly.
This is the next stage before dealing with the engine.
Take off the two remaining ¼-in. nuts (Fig. 12) that were left in place whilst the gearbox was taken off, and remove the oil filter. Tap the clutch housing carefully with a mallet or hide hammer to separate it from the crankcase, and pull it clear.
As it comes away the bottom should be drawn back first to tilt the assembly forward at the top and allow the reduction gear to clear the oil pipe (Fig. 35).
The engine and clutch housing assemblies are now ready for attention, and work can be done on the clutch or starter mechanism.